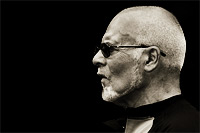
An introduction to the ‘Portraits: part one’ tutorialIn a literal sense, a portrait is a simple enough thing – a drawing, painting or photograph of a person – normally of their head and shoulders, often with them looking straight at the viewer. But a portrait can be much more than just a simple likeness or snapshot of a person. A good portrait tells a story about that person. This might be a story about their personality, their mood, their relationship to the viewer, or any number of other things, but whatever it is, a good portrait is always more than just a literal reproduction of the scene before the camera. There are many Photoshop techniques that you can use to enhance your portraits (some of which I’ve covered in previous tutorials, some of which I’ll be covering in the future), but in this tutorial I will be focussing on three things. The first is a general point about post-processing portraits – i.e. what it is you want your portrait to say – and the remaining two are techniques that I find especially useful in my own work: soft-focus effects and selective masking of a subject’s eyes, both of which can transform a mundane portrait into something much more powerful. The topics covered in this tutorial include:
By the end of this tutorial you will be able to:
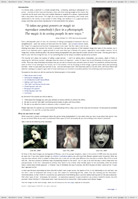
This tutorial contains 5470 words, 52 illustrative images and screen grabs, and has received 26 comments. Photoshop files included with this tutorial
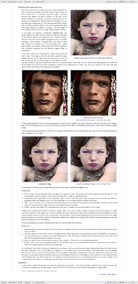
Each of our tutorials is based around a series of Photoshop files, at the resolution originally posted on chromasia, and each contains all the original adjustment layers I used to create the final image. The ones that are included in this tutorial, and a brief description of how each one will be used, are listed below – the ‘before’ version on the left, the ‘after’ version on the right. Each of these files can be downloaded after you subscribe.
What our subscribers have said about this tutorial
Content overview (the rollover graphics and embedded videos are not illustrated)
How to subscribe
Further information
To find out more about our other individual tutorials please click any of the following images. Alternatively, you can visit our main tutorials page for further information on: our annual subscriptions; our forthcoming issues; and our current members’s offers. You can also read through our sample tutorial on Tonal Range and the Curves tool.
David J. Nightingale © 2003–18 • all rights reserved
|
↓ David
↓ Libby
↓ Get the Latest News
software links
 Our annual subscribers and lifetime members can obtain a 15% discount on any of the Topaz Labs Photoshop plugins or plugin bundles.
 Our annual subscribers and lifetime members can obtain a 15% discount on Photomatix Pro.
training partners   Included above are links to a number of our training partners that we unreservedly recommend.
| ||||||||||||||||||||||||||||||||||||||||||||||||||||||||||||||||||||||||||||||||||||||||||||||||||||||||||||||||||||||||||||||||||||||||||||||||||||||||||||||||||||||||||||||||||