An introduction to the ‘High Dynamic Range images: part one’ tutorialOne of the first things we learn as photographers is that our camera sees the world in a different way to us, especially in terms of its ability to capture the full tonal range of a scene. For example, we know that if we want to take a backlit portrait we will most likely need to overexpose the shot or risk our subject’s face being lost in shadow. We also know that this will blow out the highlight details in the background. Likewise, if we wish to photograph the same subject against the backdrop of a glorious sunset, we will probably need to reconcile ourselves to the subject appearing as nothing more than a silhouette. In short, we learn that our camera has limitations and that it can’s always capture the scene as we see it. So, we stop trying to take impossible shots, and concentrate instead on doing the best job we can with equipment whose limitations we have learnt to accommodate. In this tutorial we will discuss a variety of techniques your can employ to circumvent the limitations of your equipment and produce those ‘impossible’ shots. The specific topics covered include:
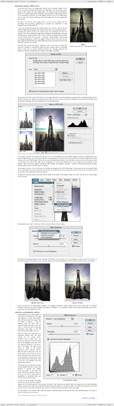
This tutorial contains 6969 words, 68 illustrative images and screen grabs, and has received 13 comments. Please note that the ‘Merge to HDR’ command, discussed in this tutorial, is only available in Photoshop version CS2 and above. Photoshop files included with this tutorial
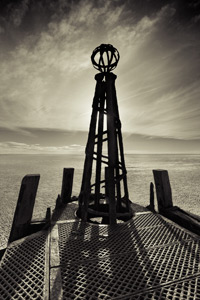
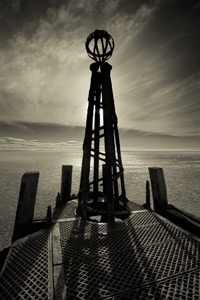
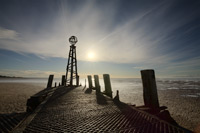
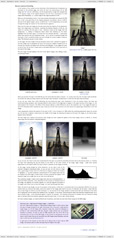
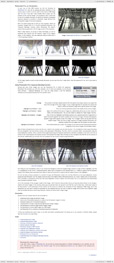
Each of our tutorials is based around a series of layered Photoshop files, at the resolution originally posted on chromasia, which you can download after you subscribe to the tutorial. The images used for this tutorial, and a brief description of each, are included below. Please note that although we noramlly include a ‘before’ and ‘after’ version of each image, this wasn’t possible for this tutorial as each of the final images was generated from a set of bracketed exposures there is no single ‘before’ shot we can show you. That said, we have included an illustrative sequence below.
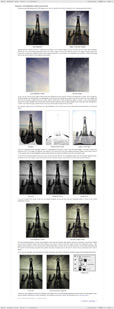
The bracketed sequence used for Image 4
What our subscribers have said about this tutorial
Content overview (the rollover graphics and embedded videos are not illustrated)
How to subscribe
Further information
To find out more about our other individual tutorials please click any of the following images. Alternatively, you can visit our main tutorials page for further information on: our annual subscriptions; our forthcoming issues; and our current members’s offers. You can also read through our sample tutorial on Tonal Range and the Curves tool.
Photomatix Pro: discount code David J. Nightingale © 2003–18 • all rights reserved
|
↓ David
↓ Libby
↓ Get the Latest News
software links
 Our annual subscribers and lifetime members can obtain a 15% discount on any of the Topaz Labs Photoshop plugins or plugin bundles.
 Our annual subscribers and lifetime members can obtain a 15% discount on Photomatix Pro.
training partners   Included above are links to a number of our training partners that we unreservedly recommend.
| |||||||||||||||||||||||||||||||||||||||||||||||||||||||||||||||||||||||||||||||||||||||||||||||||||||||||||||||||||||||||||||||||||||||||||||||||||||||||||||||||||||||||||||||||||||||||||||||