An introduction to our ‘Creative workflow’ tutorials
The majority of our Photoshop tutorials centre around a technical discussion of how to use a variety of Photoshop’s tools and techniques to alter and enhance your images, but mastery of these various tools and techniques should be seen as part of a broader process, not as an end in its own right.
In other words, technical competence is a part of the story – a story that must also include a thorough discussion of the aesthetic considerations that inform the creation of powerful and compelling images.
In our Creative workflow series of tutorials we take the creative/aesthetic process as our primary focus; i.e. rather than simply discussing how an image was constructed, we will also be considering why each change was made, and how each of these change contributes to the image as a whole. As with our other image-based tutorials, each will also include a thorough technical discussion of any tools or techniques that were employed, and you will be able to download a layered version of the PSD file, but the emphasis will be upon creative rather than technical outcomes – e.g. how each image was constructed to tell a particular story, what each image says about its subject, and so on.
How to get from this …
to this
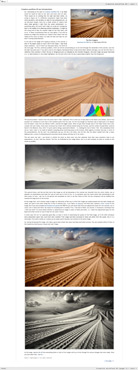
Creative workflow #7
In this tutorial we will be taking a detailed look at the various aesthetic and technical decisions that informed the creation of this image. As with all the tutorials in this series the emphasis is upon why the changes were made, not just how they were achieved.
duration: 27m 9s video size: 1280px by 800px file size: 257.1MB comments:14 comments
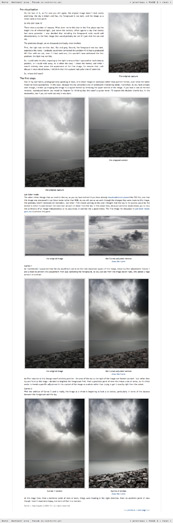
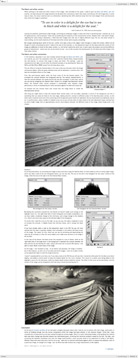
Creative workflow #6
In this tutorial we will be taking a detailed look at the various aesthetic and technical decisions that informed the creation of this toned black and white image. As with all the tutorials in this series the emphasis is upon why the changes were made, not just how they were achieved.
duration: 50m 38s video size: 1280px by 800px file size: 784MB comments:10 comments
Creative workflow #5
In this tutorial, as with our previous Creative Workflow tutorials, we will be taking a detailed look at the various aesthetic and technical decisions that informed the creation of this image. As with all the tutorials in this series the emphasis will be upon why the various changes were made, not just how these effects were achieved.
duration: 40m 16s video size: 1280px by 800px file size: 472MB comments:12 comments
Creative workflow #4
In this tutorial we will be taking a detailed look at the various aesthetic and technical decisions that informed the creation of this image. As with all our Creative Workflow tutorials, the emphasis will be upon why the various changes were made, not just how these effects were achieved.
This tutorial contains over 3900 words, and 38 illustrative images and screen grabs, and has received 6 comments.
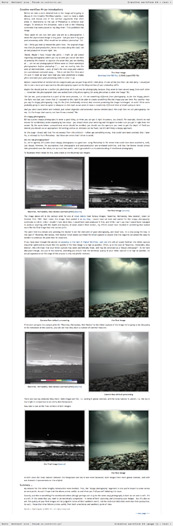
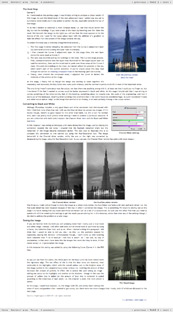
Creative workflow #3
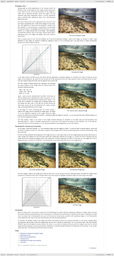
In this tutorial we will be taking a detailed look at two versions of this image: one in colour, one in black and white. In both cases though, in addition to working through the technical changes that were made, we will be taking a detailed look at the aesthetic and creative decision making that informed them.
This tutorial contains over 5500 words, and 38 illustrative images and screen grabs, and has received 11 comments.
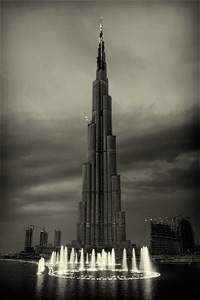
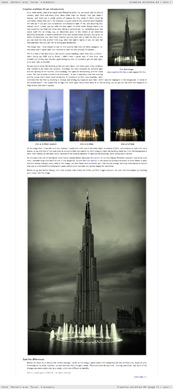
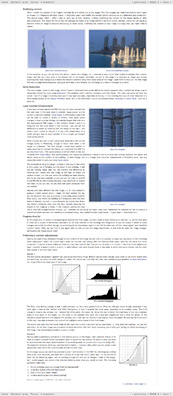
Creative workflow #2
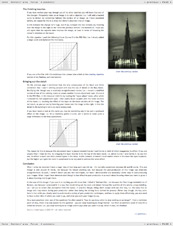
In addition to taking a detailed look at the various technical changes that were made to this image (by reference to the downloadable PSD file), this tutorial will also discuss the aesthetic decisions that informed the creation of this shot of the Burj Dubai: the world’s tallest building.
This tutorial contains over 4000 words, and 31 illustrative images and screen grabs, and has received 5 comments.
Creative workflow #1
In this, the first of our Creative workflow tutorials we will discuss how the two original images (one under-exposed and one over-exposed) were combined to produce the final image, paying particular attention to the creative implications of the various changes that were made.
This tutorial contains over 5300 words, and 34 illustrative images and screen grabs, and has received 15 comments.
What our subscribers said about #6 in this series
"Great video David explained in the usual straight forward and well thought out way, I am not sure why but I thought the adjustments would be more complex than they were, which is a surprise. "
Simon Jenkins
"A wonderful and very helpful V tutorial David. I am really glad I subscribed for the life membership. I wish though that all of them were vidoes as they are much easier to understand."
Pavan Kaul
"You guys totally rock! I just ordered the new iPad2 and plan on viewing your tutorials on it while working with my images on the computer. No more Ctrl+ Tab between screens, lol. :) Thank you so much for sharing your wealth of knowledge. All the formats you provide are excellent."
Holly
"Very helpful tutorial. It really taught me about putting mood into my photographs. Thanks alot!"
James B.
What our subscribers said about #5 in this series
"Love the video feature. Must be my right brain tendency and visual preference that makes video explanations an easier manner for me to learn. So much more dynamic than reading and re-reading until it sinks into my addled mind. Despite the sub-freezing temperatures along the Connecticut coast, I'm off to the shore tomorrow morning to capture images to which I can apply this technique. Good chance to try out my new Miller Mitts too, :-)"
Ron Landis
"Excellent, really enjoyed this one probably the most so far, have never used the guide on the horizons in that way and the toning of the top part of the sky was a great tip for a problem I often come across. Full Marks for this ;)"
Simon Jenkins
"Thanks so much for this tutorial, I think I learnt more from it than from any of your previous tutorials. The way in which you prepared the curves layers made a real breakthrough for me. Thank you"
Florian
"Excellent. I learn so much better by watching the video and listening to the thought process. I think all your tutorial should be video based. My favorite so far!"
Jim Miller
What our subscribers said about #4 in this series
"David. Another excellent tutorial on the "why" rather than the "how". In my view, this is the hardest bit - the "art" rather than the "engineering" - probably because I've spent my life to date in engineering, with the frustrated artist trying to get out. I love the commentary "sloppy photography" and, for what it's worth, agree entirely - if the end result is what you envisaged and it is pleasing and rewarding to yourself and others then you have achieved the goal of the art that is photography. If we waited for the perfect conditions or until we got the perfect location to get out there and press the shutter, then we would be missing so many opportunities - post-processing makes these excuses redundant."
Stephen Brewell
"The debate about 'when does a photograph cease to be a photograph' is as old as those on film vs digital and Canon vs Nikon. Surely, photography is an art form and as such, post processing is acceptable and good luck to those, like David, who have the skills to maximise PS's potential. I believe that. as long as the photographer/artist is honest about what they have done to create the end result, we can all decide for ourselves whether we like it.
We are not all professionals who can spend days in the field waiting for the right light. Sometimes, we have to make the best of the light we have at a given location. I enjoy my photography as a hobby and if I can create a pleasant scene using PS then I will."
Trevor Hughes
"Really good discussion David and I think you did a great job with this shot, the final toning of the image I think makes all the difference in giving it real impact and the processes are explained simply and easily.
And I think you argued your point brilliantly with regard to Ed's initial comments. When are the conditions all perfect at the same time for the perfect shot ? Very few times that's for sure, but you've shown us that by taking the best 'technically' available shot you can at the time, you've got the ability to try and reproduce what you envisioned at the time, even if the conditions weren't great."
Justin Photis
"Excellent tutorial and great explanation of how using something like Photoshop is part of the entire 'development' process of going from image capture to final realization. Photographers for years have influenced the final look of their images, choosing a particular camera and lens, choosing a particular film and processing and finally affecting the printing through various darkroom techniques. The use of Photoshop in this process is no different, but arguably easier."
James Howe
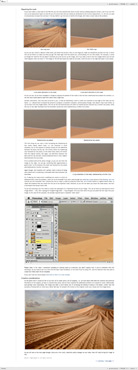
Content overview for #4 (the rollover graphics and embedded videos are not illustrated)
page 1
page 2
page 3
page 4
What our subscribers said about #3 in this series
"Another clear and easy to follow tutorial from you David, thanks very much. You lay out what the initial considerations should be and then walk us through how we should attack each stage to improve the end result. You continue to make it sound really simple, and in fact, the steps you've gone through ARE simple, which is why they're so much fun to follow. I think you're cheating though. Your starting point is always much better than mine ! :) I love the 'Creative Workflow' series, keem them coming please."
Justin Photis
"Thanks for yet another fine tutorial. The interweb would be a better place if more photography tutorials were of this quality, both in terms of the content and the presentation."
Adrian Park
"Thank you for a great tutorial. This has really helped me with thinking creative workflow to an end goal/message rather than focusing on individual mechanical steps."
Jean Eichenlaub
"Another great tutorial David, thank you."
Jason Christie
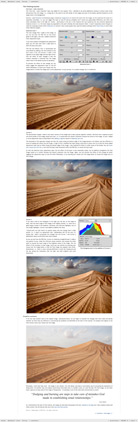
Content overview for #3 (the rollover graphics and embedded videos are not illustrated)
page 1
page 2
page 3
page 4
page 5
What our subscribers said about #2 in this series
"Once again you clearly lay out the, relatively, simple steps towards achieving the final result. There are plenty of links to previous tutorials where you've highlighted the technique you were using and the final image looks fantastic and really achieves what you set out to get.
The difference between the teacher and the students, is that clear vision you have about what you want to achieve in your final image & you've got that technical know-how to get there.
Great as always."
Justin Photis
"Thank you for the latest tutorial, it was very informative.
The words in your final paragraph really made me think and it sounds so simple but I find that I struggle to convey what I want an image to say and in the process I get frustrated. This lack of clear vision in turn means I keep working an image until its a mess and I finally give up due to the frustration. This is one of the reasons why I have gigabytes of images on disk and none framed and hanging on my walls. One day maybe it will click into place..."
Jason
"Terrific tutorial. I really appreciate hearing not only the what, but the why behind your approach.
Thanks!"
Steve
"Great!"
salvatore_ at
Content overview for #2 (the rollover graphics and embedded videos are not illustrated)
page 1
page 2
page 3
page 4
What our subscribers said about #1 in this series
"I like this, yes the technical information contained is stuff that's been covered before but that's the whole point, you can be told all the technical information and you can understand it, but if you can't think about where you want you picture to end up it'll end up a like like a run-away train. Some of the changes David outlined look miniscule, either with the curves or with some of the cloning out, but when they are put in context with his comments you think, yeah, I get why now."
Justin Photis
"Wonderful tutorial, I couldn't help but think what a nice complement Michael Freeman's book, The Photographer's Eye would make to this particular tutorial. If you had a section on suggested reading I highly recommend it as it explains color theory very well and in a major way reinforces what you are teaching. (the section of moving your eye through the image is there as well."
Tim Valloces
"Another outstanding tutorial David. It's really well written and helped me already to understand some of the thought processes that go into producing such superb images."
Roger
"This has been worth waiting for. Like many people, I can follow the step by step process with sample pictures and understand the techniques involved. I then open one of my own and wonder what I should do first, adding curves and other layers at random without really understanding what I want to achieve."
Steve
Content overview for #1 (the rollover graphics and embedded videos are not illustrated)
page 1
page 2
page 3
page 4
page 5
page 6
How to subscribe
Further information
To find out more about our other individual tutorials please click any of the following images. Alternatively, you can visit our main tutorials page for further information on: our annual subscriptions; our forthcoming issues; and our current members’s offers. You can also read through our sample tutorial on Tonal Range and the Curves tool.
Mini-PSDs
We introduced our Mini-PSDs in February 2010, and release a new image every week. Click here to see the full list of Mini-PSDs and find out more about this feature.
Critique Slot Screencasts
Our Critique Slot Screencasts provide our members with an exciting opportunity to get detailed and constructive feedback on one of their own images, gain an insight into how other members postprocess their images, and see how I might have processed that particular image. Click here to find out more.
A wonderful educational experience. I think it will be beneficial to watch several times. Especially appreciated was hearing your decision making process. Looking forward to next month.
Jean
Fantastic! I learned a LOT about Photoshop just from that video...now I can't wait to start adjusting my images more than just using a RAW converter. Maybe some images of mine that I am ready to delete might have some life after all. Thanks David!
These monthly video tutorials are going to be extremely beneficial; I can’t wait for the upcoming ones. It was great being able to watch the original image being transformed. The written tutorials are fantastic but there is still something to be said about visual learning. I enjoyed being able to see and hear the decision making that occurs, the likes and dislikes of the image, the inspection, and how you constantly return to previous layers to make adjustments. I felt like I had polished up some of the technical details from what I had learned by reading your written tutorials. Excellent work!
This was a great tutorial, full of detail and essential information, presented in a relaxed and accessible manner that sets a real benchmark for any teaching professional. Thanks very much, I really enjoyed this experience.
Jim
Absolutely fantastic. The commentary / thought process that goes on behind the various adjustments is invaluable. Thanks!
Alexis
David, excellent! Wonderful addition to your already outstanding tutorials. I anxiously await next months screencast! Again, thank you for sharing your technical knowledge and your artistic thoughts with the rest of us.
Leonard
This was a great addition to Chromasia. The information was delivered in a thorough and intelligent manner. I am very happy that I have the lifetime membership and I look forward to many more tutorials like this one. Thank you!
This approach is exactly what I needed - sound technique coupled with artistic intuitiveness presented clearly and in an understandable manner, yet acknowledging the flexibility of choices we all have. I definitely look forward to more of these.
Muzz
I love these. I learn the techniques from your tutorials, but these videos put everything together for me. Learning why you made the processing decisions that you make is incredibly helpful. Thank you for making these screencasts, I look forward to the next one.
Pauloc
software links
Our annual subscribers and lifetime members can obtain a 15% discount on any of the Topaz Labs Photoshop plugins or plugin bundles.
Our annual subscribers and lifetime members can obtain a 15% discount on Photomatix Pro.
training partners
Included above are links to a number of our training partners that we unreservedly recommend.