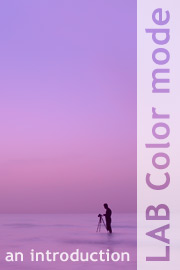
HomeOnline tutorials34 comments 
An introduction to Lab Color mode (further information)
New feature / Mini-PSDs

One of the things our subscribers have said that they find most useful are the layered PSD files that we include with each image-based tutorial. As such we’re now releasing an additional low res’ PSD file EVERY WEEK. Each image IS between 800px and 1000px wide: selected from those that have been previously published on chromasia. They are provided ‘as is’ – just the file, with little or no explanatory text – but will help you work out how each image was constructed. Annual subscribers and lifetime members can download these from the members’ page and can request that specific images be added to the archive via the members’ forum.

For further details please take a look at the following page:

    http://www.chromasia.com/tutorials/online/mini_psds.php

An introduction to Lab Color mode

Lab Color Mode (LAB) is an alternative colorspace that enables you to manipulate the luminosity and colour of your images more flexibly and powerfully than when working within RGB. In this, my first LAB tutorial, I hope to achieve three things. First, I will provide a brief explanation of the theory and numbers behind LAB (and how to work with these within Photoshop). Second, I will demonstrate the advantages of LAB over RGB – i.e. its ability to dramatically alter colour – both in terms of tone and saturation – more flexibly and with less degradation to your images than when using RGB. Third, using a range of real world examples, I will show you how to use LAB to:

  • Dramatically alter the contrast of an image without affecting its colour balance or saturation.
  • Increase the saturation of an image with less image noise and cleaner colour separation than when working in RGB.
  • Alter the tone and colour balance of your images by adjusting the ‘a’ and ‘b’ channels within LAB.
  • Invert specific colours and colour ranges using the Curves tool within LAB.

This tutorial contains 6566 words, 68 illustrative images and screen grabs, and has received 34 comments.

Photoshop files included with this tutorial

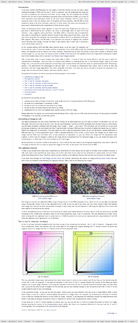
Each of our tutorials is based around a series of Photoshop files, at the resolution originally posted on chromasia, and each contains all the original adjustment layers I used to create the final image. The ones that are included in this tutorial, and a brief description of how each one will be used, are listed below – the ‘before’ version on the left, the ‘after’ version on the right. Each of these files can be downloaded after you subscribe.

How to get from this … to this
Image 1
In this example I will show you how to use LAB to dramatically increase i) the contrast of an image (using the Lightness channel), and ii) its saturation (by manipulating the ‘a’ and ‘b’ channels).
Image 2
In this example I show you how to alter the ‘a’ and ‘b’ channels within LAB colour mode to add a unique tone to your images.
Image 3
In this example I will show you how to use the ‘a’ and ‘b’ Curves to i) partially desaturate an image, and ii) alter its colour balance.
Image 4
In this example I will show you how to manipulate the ‘a’ and ‘b’ Curves to invert a specific colour range within an image.
What our subscribers have said about this tutorial

"This is a very good tutorial. When compared to Dan Margulis' work on LAB, which is complex and lacks examples, this tutorial stands out on it's own due to it's assisting photoshop users in expanding their creative wings."

Jason Hope

"Woooho. It's the stuff like this I expected to read when I subscribed to your tutorials. Thanks! :)"

Gerrit

"It's a bit difficult for me read (and write too) in english, I'm Italian, but I can understand very well what you explain in your tutorial...thank you very much for your clarity! The LAB is a true revelation for me...I think this is a fantastic tutorial, the best of all and the most exciting :-)"

Giulia

"Superb! No other words!"

Salvatore

Content overview (the rollover graphics and embedded videos are not illustrated)
page 1 page 2 page 3 page 4 page 5
How to subscribe

There are three ways to subscribe to the tutorials on chromasia, either by subscribing to an individual tutorial or by taking out an annual subscription or lifetime membership. Details regarding all three options are included below:

Subscribe to THIS TUTORIAL ONLY
For £5.00 you can take out a one year subscription to this tutorial only. On receipt of your payment you will be sent a username and password that will grant you 12 months access to the tutorial. You will also receive a £5.00 discount coupon code which you can redeem against a subsequent purchase of an annual subscription or lifetime membership. £5.00
ANNUAL SUBSCRIPTION
For £25.00 a year you can take out an annual subscription. This will give you access to all our tutorials, various members’ offers and our dedicated forum. £25.00
CLICK HERE FOR MORE INFORMATION
LIFETIME MEMBERSHIP
For a single payment of £75.00 you can take out a lifetime membership. This will give you access to all our tutorials, various members’ offers and our dedicated forum. £75.00
CLICK HERE FOR MORE INFORMATION
Further information

To find out more about our other individual tutorials please click any of the following images. Alternatively, you can visit our main tutorials page for further information on: our annual subscriptions and lifetime memberships; our forthcoming issues; and our current members’s offer. You can also read through our sample tutorial on Tonal Range and the Curves tool.

David J. Nightingale © 2003–10 • all rights reserved


HomeOnline tutorials34 comments 
An introduction to Lab Color mode (further information)